Showing posts with label windows XP. Show all posts

How To Play FLV Files In Windows Media Player

Whenever we want to play FLV files then we have to use standalone Flash/FLV player application or simply FLV player since FLV files can't be played on windows media player.So if you are a windows media player die hard fan or user and still want to use media player as application to play FLV files then there is a Freeware plugin called PlayFLV that enables Windows Media Player to play FLV files.

PlayFLV Features
* Plugin that enables Windows Media Player to playback FLV files
* Features all default functions, such as zooming, skipping and full screen view
* Creates file association: Double-click FLV files to play them in Windows Media Player
* Very lightweight plugin
* Free and open source


Read more!

How to Minimize any running application to desktop as thumbnail

What happens when we minimize a running application in our computer system, it goes down to the windows taskbar.While some other software are programmed to minimize down directly to the traybar or system tray like Utorrent client.This helps task bar to remain uncluttered in a situation where lots of applications are running.There are some third party software also that can minimize any desired program to traybar.But if your traybar too is cluttered with these applications and programs,then one possible solution is to close some less required applications, but if you don't want to close any of those running application (its bad !!!!) then then there is a third party freeware miniMIZE of just 349 KB for you.

miniMIZE is a small desktop enhancing application that catches windows that you minimize and puts a thumbnail of the main application window on your desktop so it minimize a running program to desktop as thumbnail.

miniMIZE supports exclusion list to ignore windows and applications that you don’t want to minimize to desktop as thumbnail. It also has hotkeys to cycle thumbnail levels, minimize all windows and show/hide thumbnails.But this won't work on Vista, for windows vista users there is a software Thumbwin which works similar to miniMIZE.

ThumbWin is very much the same as miniMIZE. You can set the software to be excluded from minimizing as thumbnail, supports hotkey, arrangement method and thumbnail size. But one very noticeable feature that only ThumbWin has is the fade-in/out effect. When a running program has been minimized to desktop as thumbnail, moving your mouse over to the thumbnail will make the image fade-in/out.


Read more!

How to recover damaged system files without reinstalling windows

Over the period of time our windows powered computer system start facing increased number of problem more frequently.Up to a limit we try to fix them or some time if they are not that important,we try to ignore them,but if the problem is related to windows system files then we just reinstall a fresh copy of windows because we don't know how to fix them or we just try to avoid a geeky session of experimentation. Fixing or recovering damaged system files in windows is not as hard as it seems.

Actually Windows has built in tool called System File Checker that will reload our systems file. This System File Checker has become a part of windows after the version Windows98.

To fix this problem follow the following steps carefully.
1. Disconnect the internet connection.
2. Turn Off all programs including virus protection and security programs……
3. Insert the Operating System CD.
4. Click START
5. Select the run command


6. In Run command type SFC /Scannow
7. Click OK
8. Then a system file check up will start. This may take up to an hour to be completed.
9. After the completion of scanning, remove the Operating System CD and restart the computer.
10. Then your problem will be fixed.


Read more!

Dos command to find out your login time and install date of windows

During my initial days of computing i usually install a fresh copy of windows each time i got some kind of error like if my folder options is not working because of any virus activity,or some kind of booting problem.But after becoming a Tech blogger and computer engineering student now i emphasize on solving the problem rather than installing a fresh copy of windows.

It has been a long time since i installed a fresh windows.Today i tried to find out the last time of my windows installation.For finding this i goggled my query and i found out a dos command which is very useful for finding system information.

Go to Run-->Cmd and then type systeminfo | find /i “install date” to know the date when your installed Windows on the PC. (see image)


and if you want to find out last time when you booted your windows xp PC then go to cmd and type systeminfo | find /i “boot time” .This will show the time when you last rebooted the computer.

Alternative, you could start Windows Task Manager (Alt+Ctrl+Del), switch to the Performance tab and you should see a field that says “Up Time” that’s even more convenient but some computers have Task managers disabled.

Extra tip:If you would simply type "systeminfo" without quotes in cmd,then you will lot of information about your system.Filter it your self.


Read more!

How to fix .dll file errors using DLL-files.com

Sometimes we got problems related to .DLL files like "Couldn't find ****.dll..." which most of time remain unresolved because we don't know how to deal with them, If the problem caused by .Dll files is related to Booting then at some extant we can fix it but for other kind of serious errors we have to re-install or repair windows.


Problem related to DLL files might be because of existing files being corrupted, deleted or modified by various causes such as system crashes, virus infections or even by accident. Additionally, some programs require the use of .dll files that do not come with the windows by default.

In this case some dll file errors can fixed by simply replacing the existing improper dll file but for this you need a working dll file which is hard to found somewhere else but now you can use DLL-files which is a large database of dll files and here almost any kind of dll file can be found. Simply search the site find the desired .dll file and then replace or put it at desired location.Most of the time problem will be fixed.


Read more!

How to remove virus,spyware from USB drive

If you want to remove viruses and spywares from your USB drive then first take a look how they affect your system.Most common viruses such as ’Ravmon’ , ‘New Folder.exe’, ‘Orkut is banned’ etc are spreading through USB drives. Most anti virus programs are unable to detect them and even if they do, in most cases they are unable to delete the file, only quarantine it. Here are the things which you can do if you want to remove such viruses from your USB drives but first you must learn how to keep your USB drive safe when attached to virus infected computer system ? This will reduce the chances of getting virus infected again and again.

Whenever you plug a USB drive in your system, a window will appear, this is because of autorun. For stopping autorun press shift key after plug in your USB drive.If autorun windows opens then don’t click on Ok , just choose ‘Cancel’. Open the Command Prompt by typing ‘cmd‘ in the run box. In the command prompt type the drive letter: and press enter . Now type dir /w/a and press enter.

This will display a list of the files in the pen drive. Check whether the following files are there or not

* Autorun.inf
* Ravmon.exe
* Bha.vbs
* Iexplore.vbs
* New Folder.exe
* svchost.exe
* Heap41a
* Info.exe
* or any other exe file which may be suspicious.

If any of the above files are there, then probably the USB drive is infected. In command prompt type attrib -r -a -s -h *.* and press enter. This will remove the Read Only, Archive, System and hidden file attribute from all the files. Now just delete the files using the command del filename. example del Ravmon.exe. Delete all the files that are suspicious. To be on a safer side, just scan the USB drive with an anti virus program to check whether it is free of virus or not. Now remove the drive and plug it again. In most of the cases, the real culprit turns out to be the “Autorun.inf” file which mostly gets executed when someone clicks Ok in the dialog window which appears above. Thus the infections can spread.

You can also disable your system USB if you believe that other user is infecting your system from their USB drive.To prevent this you can also keep track of all the USB attached to your system.


Read more!

Why sometimes folder takes too long to open

Sometimes when we try to open a folder then it took more time than usual and almost hangs all the other processes like it has been asked for the hiding place of Osama bin laden by George bush itself. We just think what was it and why it took so much time to open this folder.When i faced this for the first time i thought that this folder contains virus and i scanned the folder with anti virus but every thing was ok.

After that i surfed it on internet and found that it might be happening that some program in the system background is moving or copying the data excessively from the system memory to virtual memory or vice-versa , this is called Disk Thrashing.

Disk thrashing reduces the overall performance of the computer and can make even a simple task such as opening a folder take a hell lot of time. However, once you recognize which program in the background is thrashing your hard disk, you can safely end the process if it doesn’t hurts the system.

Identifying & Removing the background program thrashing the Hard Disk using Task Manager:

1. Start Task Manager. (Ctrl+Alt+Del)
2. Go to Processes Tab.
3. Click on View from the menu and then Click Columns.
4. Select I/O Writes and Click Ok.


Now, any program having a very high I/O Write will be the one thrashing your hard disk and you can end the process to stop the disk thrashing temporarily.Now that you know what is causing disk thrashing on your computer, you can begin to troubleshoot. Start by disabling programs or process, don’t just uninstall applications.

Make sure you find out why the problem is occurring (like does it happens during some specific operation? etc). Once you do, your disk thrashing days can finally come to an end.


Read more!

10 things to do when windows xp won't boot

So many times either because of some unknown reasons or due to some known activity if your windows xp enabled system is not able to boot then it is quite frustrating and during my early days of computing i usually preferred number 10 option to recover but now if i face booting problem i try to fix this problem by using these possible solution.


#1: Use Last Known Good Configuration

You can also try to boot the operating system with the Last Known Good Configuration feature. This feature will allow you to undo any changes that caused problems in the CurrentControlSet registry key, which defines hardware and driver settings. The Last Known Good Configuration feature replaces the contents of the CurrentControlSet registry key with a backup copy that was last used to successfully start up the operating system.

To use the Last Known Good Configuration feature, first restart the computer by pressing [Ctrl][Alt][Delete]. When you see the message Please select the operating system to start or hear the single beep, press [F8] to display the Windows Advanced Options menu. Select the Last Known Good Configuration item from the menu and press [Enter].

#2: Use a Windows startup disk
One of the first things you should reach for when troubleshooting a Windows XP boot problem is a Windows startup disk. This floppy disk can come in handy.

To create a Windows startup disk, insert a floppy disk into the drive of a similarly configured, working Windows XP system, launch My Computer, right-click the floppy disk icon, and select the Format command from the context menu. When you see the Format dialog box, leave all the default settings as they are and click the Start button. Once the format operation is complete, close the Format dialog box to return to My Computer, double-click the drive C icon to access the root directory, and copy the following three files to the floppy disk:


After you create the Windows startup disk, insert it into the floppy drive on the afflicted system and press [Ctrl][Alt][Delete] to reboot the computer. When you boot from the Windows startup disk, the computer will bypass the active partition and boot files on the hard disk and attempt to start Windows XP normally.

#3: Use System Restore

Another tool that might be helpful when Windows XP won't boot is System Restore. System Restore runs in the background as a service and continually monitors system-critical components for changes. When it detects an impending change, System Restore immediately makes backup copies, called restore points, of these critical components before the change occurs. In addition, System Restore is configured by default to create restore points every 24 hours.

To use System Restore, first restart the computer by pressing [Ctrl][Alt][Delete]. When you see the message Please select the operating system to start or hear the single beep, press [F8] to display the Windows Advanced Options menu. Now, select the Safe Mode item from the menu and press [Enter].

Once Windows XP boots into Safe mode, click the Start button, access the All Programs | Accessories | System Tools menu, and select System Restore. Because you're running in Safe mode, the only option on the opening screen of the System Restore wizard is Restore My Computer To An Earlier Time, and it's selected by default, so just click Next. Then, follow along with the wizard to select a restore point and begin the restoration procedure.

#4: Use Recovery Console
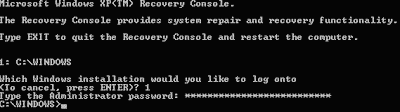

When a Windows XP boot problem is severe, you'll need to use a more drastic approach. The Windows XP CD is bootable and will provide you with access to a tool called Recovery Console.

To boot from the Windows XP CD, insert it into the CD-ROM drive on the problem system and press [Ctrl][Alt][Delete] to reboot the computer. Once the system begins booting from the CD, simply follow the prompts that will allow the loading of the basic files needed to run Setup. When you see the Welcome To Setup screen, press R to start the Recovery Console.

You'll then see a Recovery Console menu. It displays the folder containing the operating system's files and prompts you to choose the operating system you want to log on to. Just press the menu number on the keyboard, and you'll be prompted to enter the Administrator's password. You'll then find yourself at the main Recovery Console prompt.

#5: Restore from a backup

If you can't seem to repair a Windows XP system that won't boot and you have a recent backup, you can restore the system from the backup media. The method you use to restore the system will depend on what backup utility you used, so you'll need to follow the utility's instructions on how to perform a restore operation.

#6: Fix a corrupt partition boot sector

The partition boot sector is a small section of the hard disk partition that contains information about the operating system's file system (NTFS or FAT32), as well as a very small machine language program that is crucial in assisting the operating system as it loads.

If you suspect that Windows XP won't boot because the partition boot sector has been corrupted, you can use a special Recovery Console tool called Fixboot to fix it. Start by booting the system with the Windows XP CD and accessing the Recovery Console as described in #4.

To use the Fixboot tool, from the Recovery Console command prompt, type

Fixboot [drive]:

Where [drive] is the letter of the drive to which you want to write a new partition boot sector.

#7: Fix a corrupt master boot record

The master boot record occupies the first sector on the hard disk and is responsible for initiating the Windows boot procedure. The master boot record contains the partition table for the disk as well as a small program called the master boot code, which is responsible for locating the active, or bootable, partition, in the partition table. Once this occurs, the partition boot sector takes over and begins loading Windows. If the master boot record is corrupt, the partition boot sector can't do its job and Windows won't boot.

If you suspect Windows XP won't boot because the master boot record has been corrupted, you can use the Recovery Console tool Fixmbr to fix it. First, boot the system with the Windows XP CD and access the Recovery Console as described in #4.

To use the Fixmbr tool, from the Recovery Console command prompt, type

Fixmbr [device_name]

Where [device_name] is the device pathname of the drive to which you want to write a new master boot record. For example, the device pathname format for a standard bootable drive C configuration would look like this:

\Device\HardDisk0

#8: Disable automatic restart

When Windows XP encounters a fatal error, the default setting for handling such an error is to automatically reboot the system. If the error occurs while Windows XP is booting, the operating system will become stuck in a reboot cycle--rebooting over and over instead of starting up normally. In that case, you'll need to disable the option for automatically restarting on system failure.

When Windows XP begins to boot up and you see the message Please select the operating system to start or hear the single beep, press [F8] to display the Windows Advanced Options Menu. Then, select the Disable The Automatic Restart On System Failure item and press [Enter]. Now, Windows XP will hang up when it encounters the error and with any luck, it will display a stop message you can use to diagnose the problem.

#9: Fix a corrupt Boot.in

As the Windows XP operating system begins to load, the Ntldr program refers to the Boot.ini file to determine where the operating system files reside and which options to enable as the operating system continues to load. So if there's a problem rooted in the Boot.ini file, it can render Windows XP incapable of booting correctly.

If you suspect that Windows XP won't boot because Boot.ini has been corrupted, you can use the special Recovery Console version of the Bootcfg tool to fix it. Of course, you must first boot the system with the Windows XP CD and access the Recovery Console as described in #4.

To use the Bootcfg tool, from the Recovery Console command prompt, type

Bootcfg /parameter

Where /parameter is one of these required parameters

  • /Add--Scans the disk for all Windows installations and allows you to add any new ones to the Boot.ini file.
  • /Scan--Scans the disk for all Windows installations.
  • /List--Lists each entry in the Boot.ini file.
  • /Default--Sets the default operating system as the main boot entry.
  • /Rebuild--Completely re-creates the Boot.ini file. The user must confirm each step.
  • /Redirect--Allows the boot operation to be redirected to a specific port when using the Headless Administration feature. The Redirect parameter takes two parameters of its own, [Port Baudrate ] | [UseBiosSettings].
  • /Disableredirect--Disables the redirection.
#10:Install a fresh windows xp

sorry but if you have tried all the above mentioned methods then according to me this is last and only hope left you make your windows xp bootable.


Read more!

How to check hard drive for errors

Whenever our systems hard drives get any type of problems like noisy sounds, reading errors etc. then it definitely effects the overall performance of our computer system.It is recommended to check your hard drive partitions for any kind of reading errors time to time.For this Windows provide us a option for checking our hard drive partitions for any kind of reading errors and its performance has been satisfactory.
But if you want a dedicated advance tool for checking your hard drive for errors then Ariolic Disk Scanner,a freeware with a nice visual interface is quite nice tool for you.Ariolic Disk Scanner is a portable application that can be run from any location without installation.

This tool has very nice visual interface, you have to select a particular windows hard drive partition and then start scan.After this it will represent every readable sector by a green square and unreadable sectors or parts with reading errors are represented by a red square .Almost every type of drive can be scanned including hard disks, floppy disks, CD or DVDs and flash drives.

This tool is nice for finding reading errors but the problem is that it can not correct them unlike windows check disk tool.


Read more!

Notepad++ a must have freeware alternative for Notepad

Most of us uses default Notepad application in windows and its ok.We usually do not complain about this but if you have used Notepad++ i am sure that nobody is going to use that dafalut notepad in windows.Nodepad++ is just awesome.

It combines the speed and low resource usage of Notepad with an advanced functionality that includes syntax highlighting, plugins and multi-views and it also acts as text editor for almost each programming language.

Features of latest notepad++ 5.0 :
  • Improve Notepad++ performance - on startup and on exit.
  • Add Calltip capacity.
  • All the menu commands can be added in context menu, including plugins’ commands, macros and user defined commands.
  • Add bookmarked lines operations : delete all marked lines, copy all marked lines into clipboard, cut all marked lines into clipboard, paste from clipboard to replace all marked lines content.
  • Fix crash bug : Open files with date pre-1970.
  • Fix clone mode bug : now the actions done in one view will be synchronized in the cloned view.
  • Add tooltips in document tab to display the full file name path.
  • Change hide lines behaviour : Hide lines now saved during switches.
  • Change file history list behaviour : Most recent closed file is on the top. Add number on list.
  • Caret width and blink rate are customizable.
  • Add asterisk in title bar if file is dirty.
  • The bookmarks’ look & feel are improved.
  • Add “Select all” and “copy” context menu items in Find in files results window.
  • Fix goto line with command line bug.
  • Improve smart highlight / mark all / incremental search highlight all visibility
  • Tabbar’s coulours is configurable via Stylers Configurator(Active tab Text, Inactive tab text, Inactive tab background, Active tab focused indicator and Active tab unfocused indicator).
  • Add the smart highlight file size limit - 1.5 MB in order to improve the performance.
  • Add exception handling (dumping filedata)
Download notepad++ 5.0


Read more!

Freeware for finding Boot time of windows xp and vista

There are many software and tricks which claims that they can reduce boot time of your operating system and you install them or apply them but if the difference created by them is very less then you can't judge them just become you don't have any method to judge their output.

Now don't worry we have come across Boot Timer which is a small freeware utility which can help you to find out the total time taken for booting Windows OS. Download the utility and run the executable file. After installation this utility will ask permission to reboot so that it can calculate booting time.

After the booting of windows in completed,it will show you the time taken during this whole process. So you can either compare your booting time after installing a new software or can use it for detecting even a very small change in booting time by any trick or utility.

Note:This utility does not consider the time taken to go through BIOS or BIOS bootup password. It takes the time from the instant BIOS starts loading Windows.


Read more!

How to view images from Thumbs.db


I have already discussed how windows creates the thumbnails of images and videos and how they are stored in Thumbs.db file which is present in the same folder where the images are placed in windows xp. Thumbs.db file acts as the database file for the image thumbnails in windows and if required (means if deleted accidentally ) those images can be retrieved from thumbs.db file, though their quality will be poor but if you have lost some of precious images then quality can be compromised.Isn't it.

Rather than retrieving images from thumbs.db file if you want to view the images in thumbs.db file then you can also do the same.Each image is represented as a jpg image in the thumbs.db file which makes it relatively easy to extract those images again. The thumbnails are stored in a centralized location in Windows vista with the name thumbcache_xxx.db where xxx is a number between 1 and 999. That folder is located at %sysroot%\Users\Owner\AppData\Local\Microsoft\Windows\Explorer.

A flexible small tool that can extract all images from thumbs.db files is Thumbs Extract. It’s a command line utility and the command is ThumbsExtract.exe path to thumbs.db, for example ThumbsExtract.exe c:\thumbs.db if the file is located on the c:\ drive.


Read more!

How to synchronize system clock with internet server

If you want your system date/clock to be updated and synchronized by internet time server then just follow these simple steps and then your system date and time will be synchronized by internet time server automatically.After synchronizing your system date/time with internet server your system date and time will remain updated and you would not have to care about it much.


1. Right-click your clock, and then click Adjust Date/Time.
2. Click the Internet Time tab. Click the Server down arrow, and then click time.nist.gov. Notice that Internet time synchronization is enabled by default.
3. Click Update Now. Windows XP contacts the Internet time server and sets your clock. Click OK.

Now, your PC is connected to the Internet time server.


Read more!

How to edit windows right click menu

There are so many application softwares that after installation add a link to right click menu as an enhanced approach to easily utilize the resources.This is ok for a small number of options but if the list goes on increasing then it might be painful for the user to effectively utilize the right click menu as it took long time to respond.

If you have to effectively utilize it then the first option is to reduce the amount of menu options for doing so.You can't stop the various softwares to add a menu option to right click menu but now you can edit the right click menu and can remove or disable the menu options.This can be obtained by a simple registry hack so before doing so back up your registry.

Now open the registry editor by going to Start,then Run and then typing in REGEDIT.

Edit right click menu for files:

There is a right-click menu for files and another for folders. To get to the one for files, head over to this registry key:

HKEY_CLASSES_ROOT\*\shellex\ContextMenuHandlers\

You should now see a listing like this:


All the folders listed under ContextMenuHandlers are applications that show up when you right click on a file in Windows. You can either delete the folder to remove the option or simply disable the folder, which is better in case you want to bring it back later on.

You can disable an application by clicking on the folder in the left pane and then right-clicking on the key value in the right pane and choosing “Modify“.


All you need to do is add a minus (-) in front of the key value like shown below:

Click OK, then the refresh button at the top and then try right-clicking on the file! The program should now be gone from the context menu.

Edit right click menu for Folders:

You can follow the same steps as shown above for folders also, it’s just a different registry path. In order to edit the menu options for right clicking on folders, go here:

HKEY_CLASSES_ROOT\Folder\shellex\ContextMenuHandlers\

You’ll have to scroll quite a bit, but once you get there, it should look something like this:


Again, you can either delete the folders under ContextMenuHandlers or you can simply disable them by editing the key and putting a - in front of the value.You are done with your right menu option editing.


Read more!

How to prevent accidental copies in windows

IF you have to copy some random files in a folder then you start by holding down the Ctrl key and clicking on several files, one at a time. But before you highlight all the files you want to copy, the system places copies of these highlighted files back in the same folder where the files came from, giving you doubles of each file. This happens without the Ctrl key being released. Then you have to delete the copies and start over.

This is just a demo of the problem which comes under accidental copy.This phenomenon happens because of any movement,drag in cursor during the selection process and windows understand that you have performed drag and drop operation and copies each and every files selected at that time.But this might be frustrating many times.If it happens with you frequently then you can choose another selection method to avoid this.

Yes, there is another way to select and copy files without risking accidental copies. Click the topmost file you want to copy. Hold down the Ctrl key and down-arrow through the list. You’ll see a faint selection rectangle that moves down as you press the arrow. When it reaches another file you want to copy, press the space bar. (If you select the wrong file, press the space bar again to deselect.) When you’ve made your selections, press C without releasing the Ctrl key to copy the files to the clipboard. Navigate to the destination folder and press Ctrl-V to paste in copies of those files.


Read more!

Install windows xp in dual boot with preinstalled windows vista

Normally whenever we have to make our system dual boot with windows xp and windows vista then we usually install windows xp first and then install windows vista.What i mean to say is that we do not install windows xp over windows vista because after doing so we can't use windows vista,our system simply boots with only windows xp and we have no option to choose windows vista from boot meanu.

In case if you have windows vista installed on your system then you have to install windows xp first then windows vista again.But If you want to install windows xp on the computer without installing vista again means installing windows xp over vista without all this then you can use the shrink drive feature of vista so as to get a new drive on which you can install windows xp.

1. Boot in Vista and go to - right-click My Computer>>Manage>>Disk Management.
2. Right-click on the main Vista partition and select Shrink Volume.
3. Enter the shrink size and it will reduce the volume of the primary partition, leaving the rest of the disk free as unpartitioned space.
4. Now Boot Up with Windows Xp Setup Cd and simply install Windows Xp on the new unallocated partition.

5. Now you need to repair the vista boot loader as the bootloader will get corrupted and you will not need any software to do it.For this just use Bootsect.exe to restore the Windows Vista MBR and the boot code that transfers control to the Windows Boot Manager program.To do this, first go to run ans type cmd type the following command at a command prompt:

Drive:\boot\Bootsect.exe /NT60 All


In this command, Drive is the drive where the Windows Vista installation media is located.

6.Now simply boot up your windows xp/vista dual boot configuration system.This will show you two options windows vista and earlier version of windows.This is what we were trying to do.


Read more!

How to edit windows boot.ini file

Boot.ini file is among most important file in your system which tells the system how to boot and then load your operating system in to primary memory.So improper editing in this file may hamper your system's proper booting process.So avoid unnecessary editing of this file.If you look at the windows xp boot.ini file then you will find something like this.

[boot loader]
timeout=30
default=multi(0)disk(0)rdisk(0)partition(1)\WINDOWS
[operating systems]
multi(0)disk(0)rdisk(0)partition(1)\WINDOWS=”Microsoft Windows XP Professional” /fastdetect

If you want to perform some kind of editing in this one of the most important file in your system then first of all you must at least a little bit knowledge about boot.ini file.Here is the short description about windows xp boot.ini file.

The First line [Boot loader] just states the Booting Process.

timeout=30 is the time that will be provided to you to select from the list of OS’s installed. This works only in case you have multiple OS’s installed. It can be reduced easily, but make sure you give enough time to react upon it. 10 Seconds is the appropriate time.

The third line says multi(0)disk(0)rdisk(0)partition(1)\WINDOWS=”Microsoft Windows XP Professional” /fastdetect. multi(0) tells us the IDE on which the drive is attached to. Usually its Primary only. disk(0) shows the number of Hard disks mounted. rdisk(0) tells us from which disk it is booting. In case of SCSI drives, it might not show up. partition(1) tell that on which Logical partition the OS is installed on.

After that it says “Microsoft Windows XP Professional” that is the name that shows up on the OS selection page. You can put your own name there as well.This was the editable part of Boot.ini file.

Mainly editing in booting file is done either for changing the name of operating system which appear during booting process or for changing the booting time.There are two simple ways for doing them

1:By using MSCONFIG:
Open run and type MSCONFIG then click on boot.ini tab and edit the name and whatever you want to edit.Editable parts are highlighted in red.


2.By using system properties:
Right click on my computer icon on desktop-->Properties then select advance tab and under that click on settings under startup and recovery and then edit the desired option.


Though this procedure is very simple but if you have any query regarding this process or you have another method for this then share it with us by comments.


Read more!

Use your pendrive as RAM in windows xp

Windows vista provides this feature called rambooster to use your pen drive as RAM but windows xp lacks this feature.But now even windows XP users can use this feature by the use of ebooster.


Though it requires USB 2.0 for its working and look what they says about filesystem.


There is no difference in speed between FAT32 and NTFS formatted drives. If your thumb drive is less or equal to 4GB we recommend using FAT32. Use NTFS if you want the cache file sized more than 4GB (make sure that the drive has a good write speed, otherwise disable the “write-cache” option for this drive to prevent “Windows Delayed Write Failed” errors).


Overall this is good utility for the windows xp users who wants to increase their RAM by using their thumb drives.

[Download ebooster]


Read more!

Know your windows registery editor and its 5 parts

Whenever you install any application on your windows system or you just made any changes in the system settings then your actions are stored in your systems registry.You can view, analyze and modify them but it is recommended only when you know your systems registry.We deal with system registry with the help of registry editor.It has five basic parts under which all of system settings are stored.Here is the basic idea of the basic five parts of windows registry editor.


* HKEY_CLASSES_ROOT. Contains information about file types, filename extensions, and other details related to files. It tells XP how to handle different file types, and controls basic interface options like double-clicking and context menus.

*HKEY_CURRENT_USER. Contains configuration information about the setup of the person currently logged into XP. It controls the desktop, as well as XP’s specific appearance and behavior for that individual, including screen colors and the arrangement of the desktop. It also manages the connections to the network and to devices like digital cameras or printers.

* HKEY_LOCAL_MACHINE. Contains information about the computer itself, as well as the operating system. It includes specific details about all hardware, including the keyboard, printer ports, and storage devices. It also has information about security settings, installed software, system startup, drivers, and other services, like the ability to automatically connect to wireless networks.

* HKEY_USERS. Contains information about every user profile on the system.

* HKEY_CURRENT_CONFIG. Contains information about the system’s current hardware setup, in the same way that HKEY_CURRENT_USER contains information about whoever’s logged into the system at the moment. It has details like the type of hard disk installed in your PC.


Read more!

Windows logo key is a little used treasure

The Windows key or Windows logo key (in short WinKey, or rarely Flag key, Start key or Menu Key) which was originally introduced for the Windows 95 operating system , located in the bottom row of most computer keyboards is a little-used treasure. Don't' ignore it. It is the shortcut anchor for the lot of things.

Windows: Display the Start menu
Windows + D: Minimize or restore all windows
Windows + E: Display Windows Explorer
Windows + F: Display Search for files
Windows + Ctrl + F: Display Search for computer
Windows + F1: Display Help and Support Center
Windows + R: Display Run dialog box
Windows + break: Display System Properties dialog box
Windows + shift + M: Undo minimize all windows
Windows + L: Lock the workstation
Windows + U: Open Utility Manager
Windows + Q: Quick switching of users (Powertoys only)
Windows + Q: Hold Windows Key, then tap Q to scroll thru the different users on your PC

Other than this it can also perform the following functions

Under Unix and Unix-like operating systems it is often used as the Meta key or Compose key. Desktop environments such as KDE and GNOME for GNU/Linux support it, though it may be necessary to configure its functionalities after installation. Free operating systems often refer to the key as "Super".

Apple's Mac OS X uses the Windows key as a replacement for the Command key if a third-party keyboard is used that does not include the latter.This sometimes leads to placement issues for users used to Apple keyboards however, as the Command key is usually placed where the Alt key is on most keyboards (next to the Space bar).

When using a keyboard on the Xbox 360 console, pressing the Windows key performs the same action as the Guide button on the Xbox 360 controller or remote controls, opening the Xbox Guide in game play. Additionally, holding down the Windows key and pressing M opens a pop up conversation window over game play if an Instant Message conversation is in progress.


Read more!
RSS Entries

Recent Post